Pages

Thursday, April 30, 2009

Transformation

The view from back deck of Studio B has been changing dramatically over the last two months. Each of the photos represented in these stitched shots has been taken between March 2nd and today, April 30th of this year. I put them in an order that looked right and then realized later that they are not at all in order by date. The second and forth images are two times of the same day, we woke up to a light dusting of snow which quickly vanished as the sun came out.
We’ve had all kinds of weather from cold and snow, fog, to a few days this week that were downright hot! At the beginning of March we could see blue mountains in the distance and now the leaves started popping out on the trees closing us in little by little. First the cherry (?) tree started to bloom, and now we are enjoying the three small dogwood trees. (dogwoods - lower left of first image.)
What an amazing transformation. I’m grateful to live in this place. I really am.

Monday, April 27, 2009

I Saw Silver!

My final projects from the two days with Sarah Lock are all about the jeweler’s saw and a bunch of tiny little blades. I glued together two sheets of sterling silver and added my drawing to the top. I drilled holes in the design using a dremel tool that had been set up like a mini drill press (gotta get me one of those base thingi’s for my dremel!) Then carefully threading the saw’s blade through the hole and tightening it up, I commenced sawing. And sawing… and sawing... and sawing… Punctuated only by breaking saw blades. Take out the broken blade, figure out which direction and which side up the new blade goes, thread it through the work and tighten it in the saw frame, add some bee’s wax and then get back to work(and repeat!) There is a real learning curve to this process and by the end I was getting much more distance out of each blade.


It is still something that takes forever and my cuts are nothing compared to Sarah’s!! So when I was finally done sawing, I had two positive fleur de lis shapes and two negative shapes. So first of all I soldered a copper back to one and formed a large square pendant. Polishing it took forever and I noticed in the photo that when I wiped it on my shirt to remove the big fingerprint right before I snapped the photo… I scratched it up pretty good. Oh well, life does that to ya. Oh, and I added that teensy tiny little fleur to it but I might change that out and put a crystal briolette there instead. I think that might look better.

I made the two positive shapes into big dangly earrings, they are light weight so it works. I really enjoyed wailing away on these things with the whammer and look forward to more of that. It feels destructive but it’s actually quite constructive in this situation. Then I went off to spend some quality time with the polishing wheels. I added ear wires and a coin pearl to each one. The conventional wisdom of the class was that they would make better pendants because they are so big and I might go there eventually, but for right now I LURVE them as earrings!

I have another one of the negative shapes to do something with. In the process of polishing it on the wheel those points kept catching on the wheel and it would go flying out of my hand. Now that made me jumpy! I finally learned (mostly) how to do it but that piece is pretty delicate now after all that damage. No worries though, I have enough fleur de lis jewelry to last me a while.

I’m delighted that I was able to take Sarah’s class! I learned so much from her and it is good to be able to sink oneself into an absorbing task and learn to do something new. Sara Lock is an amazing woman, very sweet with incredible skills and a creative approach to problem solving. She was pulled in a million directions by the six of us but she handled it with patience and grace.

Turquoise and Wire Works

The class started with some simple wire working techniques that were just a matter of bending and being consistent. This was the first set of wire working I did in the class, combining brass and copper for a pair of earrings. Today I embellished with silver ear wires and a small gold bead with a sterling bead cap. Really a multi metal experience.

I was pleased with how this little set of coils turned out. Again, brass, copper and silver plus a tiny little sterling bead in a dashing little pair of mixed metal earrings.
Then I branched out into some hammered wire shapes with this treble clef and set of music notes in a set of delightfully miss matched earrings. And maybe it’s the new pair of fantastic turquoise heels that I got last week, but everything I worked on today had me reaching into my stash of turquoise beads.

This wasn’t at all the original idea for the piano but I’m not at all upset with how it turned out. More turquoise and an ungodly amount of time stringing that fine 24 gauge wire. I have the patience of a… never mind I can’t be bothered to come up with a workable metaphor! ;)
This is a strange little fleur de lis that is quite wonky. I’ve had a thing for fleur de lis now for years, in my mind it’s a symbol of Joan of Arc who is someone I admire greatly. I love how she bravely lived her vision in a man’s world even though it was costly and difficult. I have worked this symbol into much of my artwork over recent years. Since Katrina this fleur de lis has come to be a symbol of the revival of the city of New Orleans and the determination to see beauty come from devastation. Since I saw with my own eyes what Katrina did to the coast of Louisiana at Long Beach and Pass Christian, that place and those memories will be forever etched in my spirit. I really like how out of kilter this pendant is.

Silver-Wear...

I took an intensive metalworking class this weekend with Sarah Lock. And my Mom had just given me some stray pieces of silver flatware from a friend of ours and the two events converged rather well. I talked with Sarah for a while about making jewelry out of silver spoons and forks and then she started to show me how to work the metal. I ended up starting with my very favorite spoon which became a fabulous ring.

The other end of the spoon became this pendant with a flat hammered bowl. I love the detail on this spoon!!

These used to be long skinny iced tea spoons which made lovely bracelets.
These were two spoon handles, they are a perfect shape and length but they are a bit too heavy to be comfortable.
These look a little bit like rose leaves but they used to be grapefruit spoons. I think the long skinny earrings used to be attached to these rose leaves. I really discovered a love of hammering silver, it is soooo therapeutic!
I went to church Sunday looking like the flatware drawer blew up on my skin! And there is one pendant I didn’t get a photograph of that I’ll include some other time. It’s in the car and hubby is away in the car at the moment.

I loved using Sarah's big jewelry buffing machine, it's amazing what a good buffing can do to a piece of old flatware! And these are the two newest additions to my art equipment, a lovely ball pein whammer and a delightful pair of compound action metal snips. I even stuck one of my pink rose stickers on each of them to stake my claim. They are just the beginning of what I'm sure will one day be another studio in my house. Pretty soon there won't be room for the rest of us.

Wednesday, April 22, 2009

Strong Defenses, Vibrant Heart

I’m not sure what to call this piece, it’s one of the most personally expressive pieces I’ve done for a while. I started with a chunk of linen in a silvery blue mottled charcoal color, cut a door shaped slice into it and began layering fabrics into that opening. Then when I closed the door I ironed some wrinkles into it and layered some fabric over and through it.

As I created this piece I was thinking of what it was like to play Molly, the 18 year old young mother in the musical production of Shenandoah Moon this weekend. I had a conversation with the director about how she saw me vibrant in auditions and watched me shut down at times during rehearsals and I become “flat.” That wasn’t easy to hear but it was certainly true. There is an intense scene where one character is standing at my knee shouting over me at the man who plays my husband. I was catching the full brunt of a loud and intense energy while holding a (fake) baby in my arms. It made me shake involuntarily. One evening we had to do that scene repeatedly to work out how the details. By the time we were through that night’s rehearsal my defense mechanisms were at their highest and I was vacant and detached. My vibrancy was gone, I was flat.
My very favorite men from the show. Danny Lee to the right (Jesse Shifflett) and to the left Bill Martin (Howard) Ed Smith (Cliser) and Johnny Stoll in the hat (Erman.) Love these guys!

I began to see that if I was going to play that scene well, I was going to need to bring down the defenses. But one doesn’t just decide to lose something that has been useful in self preservation. So how to do this?

Work at it.

By the time the show rolled around I was able to do the scene, getting better and better with each performance. I knew I could engage with my character and experience her full grief but I didn’t know how long it would take me to come back from that dark place. After one performance I had to closet myself as the emotions brought up in that scene ran their course.

My situation wasn’t all that unique, there were others dealing with aspects of their characters that were too close to home. And I grew to respect actors for what they are willing to share with an audience, and what it costs them to do so. This is in some ways a sacrificial offering. I will not look at Community Theater the same way ever again.

Carmen Rose (Molly Shifflett) in my "about to bust a baby any day now" gear and Danny Lee (Jesse Shifflett)

So I thought of defense mechanisms and raw emotions as I created this piece. I wanted to show the contrast between the soft and vibrant part of me and the strong harsh shields and defenses. I used a bit of the fabric that I used in Molly’s quilt, it’s a red reproduction 1930’s style fabric. I kept the fabric edges raw and frayed. I love how the textures of the course woven linen, the smooth cotton and the fine glossy silk work together. I used a bit of the tangled vibrant fibers from the dryer and worked that into the design. The olive and magenta silks are wrinkled and mistreated but they manage to be catch the light beautifully and feel lush even with this treatment. (though it is so hard to capture this with a camera!) There is lots of texture to this piece with the frayed bits and purposeful wrinkles and I like how that worked.

I’m not sure it’s quite done. I may embellish it a bit yet, not sure. It’s expressive of this journey, there is a bit of Molly in here and a whole lot of me. And as Molly fades from view and I settle into my own skin more fully, I embrace the vibrancy, even if it is wrinkled and a bit frayed. I am not “flat.” No, not any more.

Tuesday, April 21, 2009

Dying for Color

In between all the adventures of the last week or so I dyed some fabric. It was stolen time in between everything else, just me in my studio playing with the things I love best... colors and more colors. I ended up with 22 silks:
24 white on whites, these were an afterthought and just tucked in to containers that already had fabric in dye so they only got the leftover dyes and attention. Some of them actually got some color and others are much softer but they make nice contrast with the vivid ones.
I also came out with 32 cottons; none of them are perfectly solid which makes me happy because I really wanted the hand dyed look. They are completely delicious!

I have 14 multi colored chunks of fabric in a bunch of different color ways. Some of these are really marvelous and I can't wait to sink into them.
I have 20 chunks of a heavy woven linen that took the dye in marvelous swirls and blends. These are so pretty and I even like the frayed thing that started to happen around the edges.
As all of these went through the dryer I also ended up with the most beautiful dryer lint, bet you think I'm joking. I've saved it, it will turn up in something but I don't know what yet.

I need to spend a little time mixing up the colors that are missing in these color ways. It was a good experiment with the 26 ready made procion dyes I was working with, now I need to see what can be done about mixing up the other colors that I would like to finish out the blends.
Plus, I have the seaweed and flowable paints and I'd like to try marbeling some fabric. Sometime soon, but not likely today. I'm still trying to recoup from last week. Seems like I feel every one of my forty years right now. So I am trying to take it easy. But color... nothing restores my soul like color.

Monday, April 20, 2009

Some Photos From Shenandoah Moon.

I made the rag doll this little girl is holding. The Brown family was thrown out of their home by the CCC to make way for the Skyline Drive.

I don't have many on stage photos. They were taken, they just aren't available yet. So I'm still hoping to get ahold of some.
That's me about to "bust a baby any day now." (before we changed the costume a little bit, this photo is from final dress.)
This is an intense scene. The guy standing over me is really a charming man but this scene is full of his character's rage. He says something horrible and I go to this guy for comfort:

They fight some more and then this is the last moment before the lights go out on us:

I think this must be a shot of our closing song but it's before the bows so I'm not really sure when it was taken. I'm the forth little bitty face dot from the right. It was a huge cast, some thirty people or so.

All the info you could possibly want and then some: here.

Finishing up the Cake.


Finally we come to the interesting stuff, though I was really down to the wire with this cake so I didn’t get many photographs at this stage. I drove the cake to location, stacked the three tiers and began to decorate them. Now usually I would have decorated them and then transported them but I was running out of time. By that time I’d had three hours of sleep and it was an afternoon shindig. I decorated small “50’s” with some hearts/swirly things and some small fleur de lais. Each edge got a border and that was pretty much it for the details on the cake.

I added a bunch of colorful fresh flowers...

And then set the cake in place. Then we got some photos and then the guests started to arrive. Whew, that was close!

39 (million) easy steps to making a wedding cake, Part Two: icing the cake.


Icing a cake really isn’t that difficult if you know what to do, and if you get good at it then it doesn’t take that long either. Unless you start work at 1:00 am after a performance and a cast party and work until 4:45 am Saturday morning, then it seems like a long time. But I made all the fillings and icings and iced six tiers in that time so there wasn’t any grass growing under my feet. I don’t usually do that but it turned out fine. My husband was in bed clear on the other side of the house and I was able to have all the lights on and the music up without bothering him at all.

I made a white chocolate marzipan filling and a chocolate hazelnut filling, and those are recipes I don’t share. Yumm! And I decided to mix the white and chocolate cake layers together. So the first step is retrieving the layers from the freezer and unwrapping them to cut. I used a big expensive serrated blade knife that I called “the sword” for cutting cake when I worked as a professional cake designer but a cheap electric knife works ok.

I hurt myself with that sword once, I was cutting toward my hand and giving some real pressure to a especially hard frozen cake. It was for a wedding on New Years Day and so there wasn’t anyone else around. Something slipped and that knife ended up between my thumb and my thumb nail back about a third of an inch in. I was working alone in the bakery that evening and there was no way to get around the deadline of the cake so I had to think fast. I found the superglue and poured that into the wound, put the thumb nail back in place and taped it all up tightly and put on a glove. I cleaned up the mess and got back to work and had that wedding cake done in time for the reception. And I kept gluing and taping that thumb nail back together until the wounded part grew out and my thumb is perfectly fine now. All that to say that cutting a frozen cake can be dangerous so be careful! Put your hand on top of the cake and cut toward the center of the cake while turning, do not aim at your hand and keep your fingers out of the way!

Trim the top and bottom of each layer, especially when using a white or yellow cake, make sure to remove all the brown “skin” the cake gets on top and the part next to the pan. This gets rid of all the hard and dry parts of the cake, and believe me, it makes a difference in how people experience the cake! Layer the cake with fillings, being careful not to fill so much that the filling will migrate. You want flavor without adding bulk. When all the layers are stacked the carefully trim the sides of the cake until you are back past the brown dry edges. Trim to level the top if needed.

Now you are ready to apply a thin “crumb coat” of icing to the cake. Do this immediately because you don’t want the trimmed cake drying out. Seal in all that moisture right away with a thin coat. You can either set the cake back in the freezer until you have a firm surface or just wait for the icing to solidify a bit while you are working on other tiers.

Finally, come back and add the final coat of icing starting on the top and then doing the sides with a long icing knife. As long as you keep icing between your cake and your knife, you won’t bring up crumbs from the crumb coat and you can get an excellent smooth surface this way.

Now for a wedding cake I will take an additional measure to achieve a smooth surface. Fill a clean spray bottle with cool water and spray the cake thoroughly while spinning it on the turn table. Carefully work all the marks out of the icing keeping plenty of water between the knife blade and the icing. Work the top first then do the sides. This should result in an ultra smooth cake if done properly. Don’t remove icing from the cake, simply allow the water and very gentle pressure to augment what is there into a perfect porcelain smooth surface. Clean the board and allow the cake to dry and then you are ready to decorate as desired.

39 (million) simple steps to making a great wedding cake! (Part One)

Last week I made a wedding cake for my parent’s 50th anniversary celebration. I thought I’d share some of the steps along the way. It’s really not that difficult to do, but messing it up isn’t that hard either. So here are some things I’ve learned over the years making wedding and special occasion cakes. Everyone has seen the beautiful cake that is a disappointment to taste, but it doesn’t have to be that way.

Some people think cakes made from scratch are best, but I don’t agree. I start with a cake mix and add all the stuff it says on the box, just in a slightly different formulation.
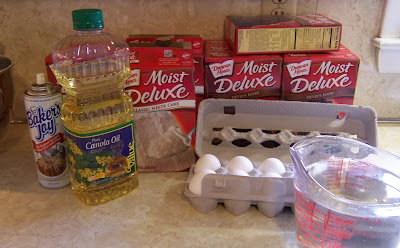
It’s pretty simple really, two cake mixes, (I have always used Duncan Hines) six jumbo eggs, 1 cup canola oil (for chocolate I sometimes use a good olive oil) and 1 cup water. It makes a thick heavy batter that requires spreading in the pan. And I always add 1 cup applesauce to chocolate cake, you never really taste it (unless the apple sauce is too strong) but it does wonders for the texture and moisture content of a cake.
Spray the pans with baker’s joy and divide the batter between pans. In this photo I’m baking a 14 and a 6 inch round, so the two mixes work out perfectly.
Most people over bake cakes, they want a toothpick to turn out dry but that also means the cake will be dry. The better test is to keep a timer and watch a few key elements: first, if you open the oven door and the whole cake jiggles, it’s is not ready to be touched, very carefully get that oven door closed! If you lightly touch the cake and it leaves a dip, the cake is almost done but not quite. It should spring back when you touch it.
The cake will start to shrink from the sides of the pan and that is your second indicator. Use an oven thermometer and do your best to keep the temperature at an even 350 degrees. My oven is an old one and bakes a bit unevenly so that is one thing to keep in mind, sometimes one layer will be finished and the other one will not be.
If you want two layers inside your cake, then bake two layers for each tier. Some people use deeper pans and bake a large layer and then cut it. I know it’s more work and more baking time but I think the cake is better if baked in the 2 inch pans as opposed to the really deep pans.
When the cake comes out of the oven, immediately cover it with waxed paper and flip it on to a board.
Get the cake pan off as soon as you can and wrap the cake in plastic wrap, sealing it as much as possible. It is important that you don’t leave the cake out on a wire rack or allow it to dry out while cooling, this just makes a dry cake with a hard crust. Yuck!
As soon as it has mostly cooled the cake should be moved to the freezer. This will help to preserve the moisture content of the cake and make it possible to do things like bake a cake on a Tuesday and then serve it on a Saturday like I did.

More info and photos coming. Stay tuned.
Related Posts with Thumbnails