Pages

Showing posts with label cake. Show all posts

Saturday, January 22, 2011

Lemon Blueberry Crumble Cake

I was trying for a beautiful slice to photograph but it was warm and it crumbled into bits when I tried to take it out of the pan, and plus... by that time I was starving and salivating and that piece was MINE!  No worries, it looked crumbly but it was DELICIOUS!  And I have eaten the whole thing!  

Wishing you a happy yum,
-Carmen Rose

Thursday, March 25, 2010

Red Velvet

I made some cupcakes today for a little gathering of women at my house this evening.  I have never made a red velvet cake before, mainly because I don't like dye in my food, and the flavor can tend to be... well... let's face it... red velvet cake doesn't have much flavor.  So I decided to make a red velvet cake with beet puree in it for the color so I could skip the chemical dyes.  Only I didn't think it was chocolatey enough, so I added more cocoa.  Problem is, when you add more chocolate you lose the red color.  Soo... my "red velvets" looked a little...

...well... not very red. I tried them, and had eaten three by the time I realized I just didn't like them very much. Really good chocolate cake isn't hard to make, this just wasn't it.

Mmmm... cupcakes! They look hopeful, don't they?!

The theme of the party required red food, thus red velvet cake. So... since that didn't really work out I made chocolate ganache and strawberries with a dash of lime. And I don't care what it is, if you drench it in ganache, then it will turn out to be good. And strawberries are always the right color and yummy also!

Soo... I won't be making red velvet cake again, but it was lovely to have the ladies here. It was a fun evening.

Any excuse to celebrate,
-Carmen Rose

Friday, January 15, 2010

Chocolate Cake

Last evening I tried an experiment. I’d heard a friend mention 5 minute microwave cake, they raved over how good it was. I was curious, I researched it a bit and found that this kind of thing gets a very mixed reviews. So I had to try it.


Here's the recipe if you'd like to try it: (serves two)
(But before you scamper off to get out your mug and reach for an egg... please FIRST read the rest of the post!)   =)

* * * * * * * * * *
5 MINUTE CHOCOLATE MUG CAKE

4 tablespoons flour
4 tablespoons sugar
2 tablespoons cocoa
1 egg
3 tablespoons milk
3 tablespoons oil
3 tablespoons chocolate chips (optional)
a small splash of vanilla extract
1 large coffee mug
Add dry ingredients to mug, and mix well. Add the egg and mix thoroughly. Pour in the milk and oil and mix well. Add the chocolate chips (if using) and vanilla extract, and mix again.
Put your mug in the microwave and cook for 3 minutes at 1000 watts. The cake will rise over the top of the mug, but don't be alarmed! Allow to cool a little, and tip out onto a plate if desired.
* * * * * * * * *

As an aside, my first business was one I started in college making wedding cakes for my friends. I am familiar with chocolate cake, and I may be a *tad* bit biased about what constitutes good cake. But I followed the recipe, and popped that thang in the mic. I used two mugs instead of one because I wasn’t going to eat the whole thing anyway. I watched it turning, and I started to catch the aroma of cooking cake. Hmmm… maybe this won’t be so bad, it smells good. I pulled it out, I wasn’t sure what to think of the appearance, so I popped it out on a plate and cut it open. It was done, no question about that. So how did it taste? It tasted exactly like you’d expect chocolate cake to taste that had been made in the microwave… it was… uh… rubbery. I figured I could get past the texture if the flavor was good, was it? Nope. Never again. Dang, how cool would it have been if it HAD been good?! Who doesn’t like the idea of a nice warm chocolate cake in 5 minutes and only dirtying a spoon and a mug?

I had a good friend over to Studio B today. We finished up a lovely lunch and I assessed the situation. Was that complete? Or did we need something yet? I looked at her and asked if she’d be interested in having molten chocolate cake?  We could make it together. She thought for a moment, I could see the wheels turning. And then she answered with a resounding “Yes!” I laughed with delight, some people are so afraid of good food that they won’t even try something if they think it’s loaded with calories. (Sometimes things that taste rich and decadent don't actually aren't all that loaded, it's just that everything is in balance - that's a mark of a great recipe in my opinion!)

And so we made chocolate molten cake. It didn’t take long to make, it took twelve minutes to bake. We added a little bit of peppermint ice cream…. and it was good! Well… I should say… it was excellent. There could not be more difference between the two chocolate cake experiences. It’s very different kind of cake than I would make for a wedding or special occasion cake, but it’s really really good.

So I ask you, why would anyone ever eat a cake that took five minutes to bake, when you could have this chocolate molten cake that took only seven additional minutes to bake? Because I’ll tell ya, they aren’t even in the same ballpark when it comes to flavor! Believe me, it is worth the wait!  (Can seven minutes reasonably be considered "a wait"?!)


And so... (Drum rollllllllllll)
I'm very pleased to present


(serves four)

And I made it with this baking chocolate... the stuff is HIGH TEST.

 
Seriously, there is a reason why dark chocolate is a super food
I try not to knock it.


And please allow me to point out that cake for cake... 
the molten chocolate recipe will have less calories.  
~ Think of it as health food. ~ 


Wishing you warm chocolaty goodness,
-Carmen Rose


PS WHY DIDN'T I TAKE PHOTOS?!
(Because for just a second there, living was more important than documenting.)

Tuesday, July 21, 2009

Tasty Treats

This was dinner last night. And yeah, it tasted good. Maybe even better than it looks even. To start out I sautéed up yellow squash, green beans, red onions, and zucchini in the jalapeño flavored oil that I made the other day. So they were spicy and cooked so they still had their color and were still crunchy. I did potatoes with some salt and balsamic vinegar and they had a little crunch to them. Then the steak was sautéed up quickly with mesquite smoked pepper. The spaghetti was left over and I opened a can of mandarin oranges for a little sweetness. I layered everything up with lime juice and fresh basil over the top.

This was so fun to experiment with the creative process when it comes to food, I enjoyed it very much.

It was an interesting combination of the spicy kick from the jalapeño oil, the sweet/tang of the citrus and the flavor of a great Omaha steak. Mercy it was good. I was a little concerned about what hubby would say because he likes his food to be pretty conventional but he really liked it.

I love the Food Network, it makes me consider cooking with things like texture, spicy heat, sweet , tart, fresh herbs and… of course… COLOR!

Yum.

Then hubby felt inspired to pull an old cake out of the freezer, saw off a hunk and set it to thaw on the kitchen counter. We both ate a piece before we went to bed last night.

And Hope had her piece this morning. Leaving her whisker and tooth marks for us. I walked into the kitchen this morning and looked at the cake and she looked at me and started to growl. So I guess we know it was her and not Misde. What an opportunistic brat-dog!

Yeah, go ahead, look innocent. We all know better!

Monday, July 6, 2009

My Cake

Featured in Cake Wrecks Sunday Sweets section over the weekend. (The Non-Wreck part.) That's fun! Kudos in the comments also which is kind of fun to read. Yay!

Monday, April 20, 2009

Finishing up the Cake.


Finally we come to the interesting stuff, though I was really down to the wire with this cake so I didn’t get many photographs at this stage. I drove the cake to location, stacked the three tiers and began to decorate them. Now usually I would have decorated them and then transported them but I was running out of time. By that time I’d had three hours of sleep and it was an afternoon shindig. I decorated small “50’s” with some hearts/swirly things and some small fleur de lais. Each edge got a border and that was pretty much it for the details on the cake.

I added a bunch of colorful fresh flowers...

And then set the cake in place. Then we got some photos and then the guests started to arrive. Whew, that was close!

39 (million) easy steps to making a wedding cake, Part Two: icing the cake.


Icing a cake really isn’t that difficult if you know what to do, and if you get good at it then it doesn’t take that long either. Unless you start work at 1:00 am after a performance and a cast party and work until 4:45 am Saturday morning, then it seems like a long time. But I made all the fillings and icings and iced six tiers in that time so there wasn’t any grass growing under my feet. I don’t usually do that but it turned out fine. My husband was in bed clear on the other side of the house and I was able to have all the lights on and the music up without bothering him at all.

I made a white chocolate marzipan filling and a chocolate hazelnut filling, and those are recipes I don’t share. Yumm! And I decided to mix the white and chocolate cake layers together. So the first step is retrieving the layers from the freezer and unwrapping them to cut. I used a big expensive serrated blade knife that I called “the sword” for cutting cake when I worked as a professional cake designer but a cheap electric knife works ok.

I hurt myself with that sword once, I was cutting toward my hand and giving some real pressure to a especially hard frozen cake. It was for a wedding on New Years Day and so there wasn’t anyone else around. Something slipped and that knife ended up between my thumb and my thumb nail back about a third of an inch in. I was working alone in the bakery that evening and there was no way to get around the deadline of the cake so I had to think fast. I found the superglue and poured that into the wound, put the thumb nail back in place and taped it all up tightly and put on a glove. I cleaned up the mess and got back to work and had that wedding cake done in time for the reception. And I kept gluing and taping that thumb nail back together until the wounded part grew out and my thumb is perfectly fine now. All that to say that cutting a frozen cake can be dangerous so be careful! Put your hand on top of the cake and cut toward the center of the cake while turning, do not aim at your hand and keep your fingers out of the way!

Trim the top and bottom of each layer, especially when using a white or yellow cake, make sure to remove all the brown “skin” the cake gets on top and the part next to the pan. This gets rid of all the hard and dry parts of the cake, and believe me, it makes a difference in how people experience the cake! Layer the cake with fillings, being careful not to fill so much that the filling will migrate. You want flavor without adding bulk. When all the layers are stacked the carefully trim the sides of the cake until you are back past the brown dry edges. Trim to level the top if needed.

Now you are ready to apply a thin “crumb coat” of icing to the cake. Do this immediately because you don’t want the trimmed cake drying out. Seal in all that moisture right away with a thin coat. You can either set the cake back in the freezer until you have a firm surface or just wait for the icing to solidify a bit while you are working on other tiers.

Finally, come back and add the final coat of icing starting on the top and then doing the sides with a long icing knife. As long as you keep icing between your cake and your knife, you won’t bring up crumbs from the crumb coat and you can get an excellent smooth surface this way.

Now for a wedding cake I will take an additional measure to achieve a smooth surface. Fill a clean spray bottle with cool water and spray the cake thoroughly while spinning it on the turn table. Carefully work all the marks out of the icing keeping plenty of water between the knife blade and the icing. Work the top first then do the sides. This should result in an ultra smooth cake if done properly. Don’t remove icing from the cake, simply allow the water and very gentle pressure to augment what is there into a perfect porcelain smooth surface. Clean the board and allow the cake to dry and then you are ready to decorate as desired.

39 (million) simple steps to making a great wedding cake! (Part One)

Last week I made a wedding cake for my parent’s 50th anniversary celebration. I thought I’d share some of the steps along the way. It’s really not that difficult to do, but messing it up isn’t that hard either. So here are some things I’ve learned over the years making wedding and special occasion cakes. Everyone has seen the beautiful cake that is a disappointment to taste, but it doesn’t have to be that way.

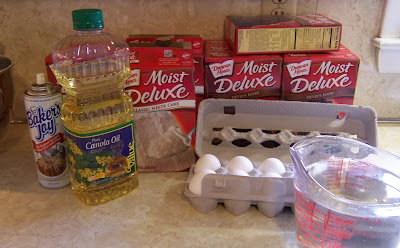
Some people think cakes made from scratch are best, but I don’t agree. I start with a cake mix and add all the stuff it says on the box, just in a slightly different formulation.
It’s pretty simple really, two cake mixes, (I have always used Duncan Hines) six jumbo eggs, 1 cup canola oil (for chocolate I sometimes use a good olive oil) and 1 cup water. It makes a thick heavy batter that requires spreading in the pan. And I always add 1 cup applesauce to chocolate cake, you never really taste it (unless the apple sauce is too strong) but it does wonders for the texture and moisture content of a cake.
Spray the pans with baker’s joy and divide the batter between pans. In this photo I’m baking a 14 and a 6 inch round, so the two mixes work out perfectly.
Most people over bake cakes, they want a toothpick to turn out dry but that also means the cake will be dry. The better test is to keep a timer and watch a few key elements: first, if you open the oven door and the whole cake jiggles, it’s is not ready to be touched, very carefully get that oven door closed! If you lightly touch the cake and it leaves a dip, the cake is almost done but not quite. It should spring back when you touch it.
The cake will start to shrink from the sides of the pan and that is your second indicator. Use an oven thermometer and do your best to keep the temperature at an even 350 degrees. My oven is an old one and bakes a bit unevenly so that is one thing to keep in mind, sometimes one layer will be finished and the other one will not be.
If you want two layers inside your cake, then bake two layers for each tier. Some people use deeper pans and bake a large layer and then cut it. I know it’s more work and more baking time but I think the cake is better if baked in the 2 inch pans as opposed to the really deep pans.
When the cake comes out of the oven, immediately cover it with waxed paper and flip it on to a board.
Get the cake pan off as soon as you can and wrap the cake in plastic wrap, sealing it as much as possible. It is important that you don’t leave the cake out on a wire rack or allow it to dry out while cooling, this just makes a dry cake with a hard crust. Yuck!
As soon as it has mostly cooled the cake should be moved to the freezer. This will help to preserve the moisture content of the cake and make it possible to do things like bake a cake on a Tuesday and then serve it on a Saturday like I did.

More info and photos coming. Stay tuned.

Update

Well I’m playing “catch up” here today. I’ve been out of the studio the last ten days with a whirlwind of activity and adventure. We had a demanding rehearsal and show schedule for Shenandoah Moon with double tech the Saturday before Easter and then dress rehearsals, the show and a series of cast parties plus the final strike. It was an amazing experience and I am now hooked on community theater. I want to do this again!

This Saturday I hosted my parent’s 50th wedding anniversary celebration. It was a beautiful event and I made the wedding cake. I left a little early after the party in order to go perform but there were others who stayed to help clean up. It was fun to connect with friends of my family who have known me from when I was a wee little girl.

I hope to be posting photos and telling the tales soon, but for now I think a nap is very much in order.

Friday, August 22, 2008

The New Gourmet Soaps and a Studio Announcement!

I am delighted to announce that we've added a new person to the crew here at Carmen Rose Studio. Welcome Jeni! Your help has already been a huge blessing!

Here is the new Mint Chocolate Torte that is a combination of Chocolate, Peppermint and Creme de Mint and I think it smells as good as it looks. This one has been pretty quick off the shelf already.
The Wildberry Torte is time consuming to make, but just looks so pretty when it's finished. First the torte is made, then each of the berries are made and arranged in the torte, then the glaze fills it all in.

I love the new Lemon Meringue, it looks richer and creamier than ever.
Key Lime Pie, always a favorite around here for the look, but especially for the smell!

This blueberry Cheesecake turned out nicely with a wildberry glaze running down the sides. I'd just like to try a bite of this one.
I had a little crust leftover from the Lemon Meringue and breathed a quick prayer on what to do with it. This is the idea that was instantly in my mind and I am very happy with how they turned out! So this is the New York Style Cheesecake ~ yum, Yum, YUMMM!

And it's all SOAP!

More information on the complete line of gourmet soaps can be found here.
And we've just made it possible to purchase these online!

Sunday, August 3, 2008

Time to Celebrate!

I looked back over a few blog posts this evening and had to laugh a little at the diversity of my work this month. From roofing to a king sized quilt, and hundreds of bars of soap… That’s what I love about my work, never can tell what’s coming next!

One of this week’s special projects was a wedding cake I made for friends. I was really happy with how this one turned out. The cake had four tiers and two more tiers in the kitchen. Two were white cake with a white chocolate almond filling. Two were chocolate cake with crème de mint filling and two were banana cake. All three flavors turned out very nice and there were no end to the compliments. It is a little hard to see the swirl design in the photos but I was happy with how it turned out.
Tom and Rachel are a beautiful couple. More than that, they both possess a soft hearted compassion that is really something special. Their wedding was a beautiful treat!

As people gathered around them to cut the cake, the bride was looking over her shoulder at the cake. Then she found me in the crowd and mouthed “thank you SO much!” What a sweet sweet girl! And isn't her dress beautiful?! She had it made when she was recently traveling in Cambodia with her Missionary father. She looked incredible!
Related Posts with Thumbnails